Zoom allows you to share your screen – or any file that is open and visible on your screen – with all participants in a meeting.
This requires some advance preparation:
- Identify all of the files you’ll want to use as input during the Zoom class, and have them open in separate windows on your screen. (The Share Screen feature can only access open files.)
- Because of the way Zoom identifies the window to be shown, each internet source you want to share must be opened in a separate browser window, rather than in multiple tabs in one window. (The Share Screen feature can only access visible sources.)
To access Share Screen during the meeting:
- Click on the green Share Screen icon in the bar at the bottom of the Zoom screen (or Control + S on a PC / Command + Shift + S on a Mac).
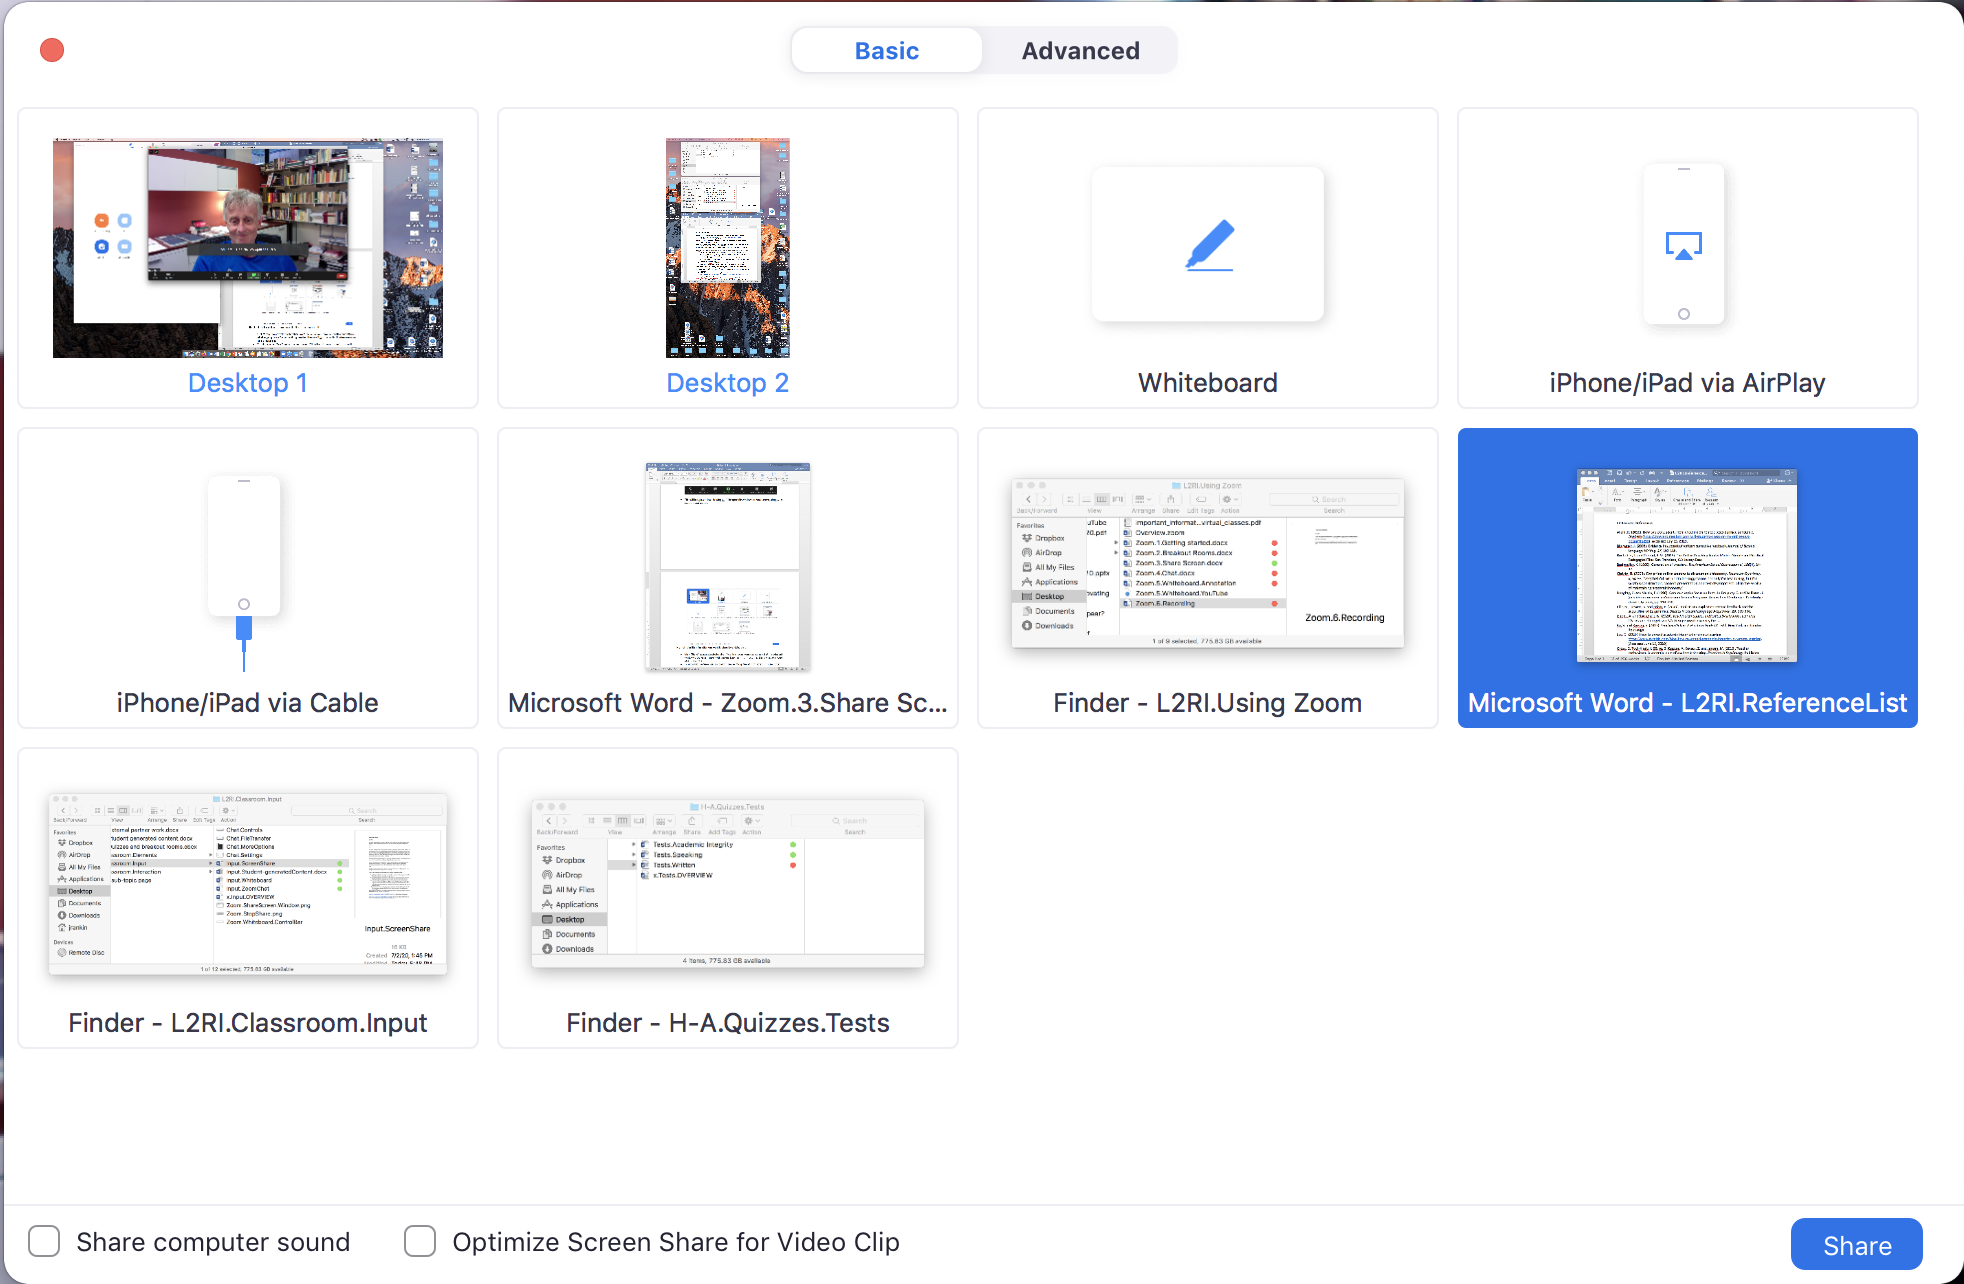
- This will open a window showing all of the open file windows on your screen, including the desktop screen itself, along with several other options:
- Click on the window showing the resource you want to share. (In the example above, it's a Microsoft Word document.)
- Click Share in the lower right-hand corner, which makes that resource visible to all participants. You’ll notice on your own screen that the selected resource is framed with a green band, reminding you that this is what everyone else is looking at.
- While you’re sharing this, the control bar from the Main Session is replaced by a floating Share Screen control bar:
- To return to the Main Session, click on the red Stop Share underneath the control panel that appears on the edge of your screen.


A few more tips:
- New Share: While in Screen Share mode, you can switch the input sources by clicking on New Share in the control panel (shown above). This brings up the Share Screen Window, allowing you to choose a different window/program you want to share and avoiding a detour back to the Main Session.
- PowerPoint: When sharing a PowerPoint document: Share Screen shows exactly what you’ve opened, which means that if you have a PPT document open on your desktop, the participants will see that window — with all of the slides showing — until you “play” the slideshow. (This may be all you need to show, if the window with the current slide is sufficiently large, but some may find it less professional looking.) Once you start the Slide Show, the PowerPoint function will fill their screen and yours (unless you’ve opted out of that in your Settings) — and will remain there even after you leave Share Screen mode.
- Group Share Screen enabling: To allow students to share their screens with everyone else, you’ll need to enable that feature in the Settings (on the home page of the web portal) under “In Meeting (Basic).” You can also enable Share Screen for participants by clicking on the Security badge in the control bar — but remember that this will allow everyone to share their screens, at any time. (Participants can share their screens by default in the Breakout Rooms.)
- Selective Share Screen enabling: You can enable the Share Screen feature for one student at a time by changing their status temporarily to “co-host”: Move your cursor over their image in the gallery, then over the three dots in the upper right-hand corner, and use the drop-down menu to give them “co-host” status. This allows them to share their screen, but it does not allow them to control the Breakout Room functions, which are controlled solely by the host. (The host can transfer the "host" role fully to another participant, who will then have full control over all features that have been enabled for the meeting.)
Resources
For further help in setting up Share Screen in Zoom Settings, and using it to share PowerPoint slides, video and other resources:
Zoom’s basic information: [1:11]
Additional information on Share Screen and its connection with Breakout Rooms: [14:10]
