“Over my decades of teaching, I've learned to read a room pretty well: the harmonized posture, the breaths, the laughter, the eye gaze. My classes are successful when everyone is so excited that they want to speak over each other out of sheer exuberance (… ). Technological platforms such as Zoom provide some imitations of face‐to‐face interaction, what I notice the most is that I miss the three‐dimensional faces and the bodies and the eyes and the breaths.”
Blum (2020) “Why we're exhausted ...”
For all its faults — and Blum outlines them in vivid detail — Zoom remains one of the best platforms for conducting remotely taught L2 classes. It provides multiple options for oral, visual and textual input; replicates the pair work that many L2 courses depend on; and offers ways to control the platform that gives instructors considerable freedom of choice.
It's important to understand that Zoom has two interfaces:
- a web portal, where all of the settings and profiles are available
- an app, which is a much simpler, more streamlined interface — but without many of the controls.
Each of these uses different procedures to invite participants and open a meeting; but once the meeting is “live,” the interface and user experience are identical.
Configuring Your Account
(This assumes that you’ve downloaded Zoom for Princeton users: https://princeton.zoom.us)
Click on Sign in on the home page of the Web Portal. This will bring up your profile information, a navigation column on the left for configuring meetings, recordings, and various other settings, and three options at the top of the page: Schedule a Meeting | Join a Meeting | Host a Meeting
As a Princeton instructor, some of your Profile information may already be filled in; you can supply any missing elements.
Scheduling Meetings:
- Click on the Meetings in the navigation column (see above).
- Click on Schedule a New Meeting and fill in the information.
- If this is for a recurring meeting, such as an L2 class (M-F), supply the information for dates and times.
- Clicking on Save at the bottom of the page will generate an “invite link” with a URL containing a long number; this number is the ID for the meeting — and will remain the same for all recurring meetings listed. For language classes meeting M-F, you may wish to create a week-long recurring meeting ID, so that students will always know which ID to use for your course. (If you schedule your classes in Canvas, a Zoom meeting ID will be generated there for you.)
- Send the full invitation to students, or at least the Meeting ID number, unless the Canvas/Zoom option does so for you automatically. At the beginning of the course, remind students several times where they should look for the ID — either in their email or on the course Canvas page.
Settings:
Click on Settings in the navigation column (see above) to bring up the Settings list.
There are many, many choices here, and no two instructors will want the same options. Here are a few you may wish to disable/enable for a language class:
DISABLE the Waiting Room. This will allow students to join the “real” meeting immediately and chat with each other. You can enable it for speaking tests, office hours or other meetings that need to be kept private (see Tests → Speaking).
ENABLE:
- “Only authenticated users can join meetings”: This will prevent Zoombombing, i.e., uninvited participants showing up in the meeting (often with malign intent).
- Host video
- Participants video
- Computer Audio / Telephone and Computer Audio (though presumably none of our students will be using the telephone option)
- Join before host
- Chat / “Prevent participants from saving chat”
- Sound notification when someone joins or leaves (to keep track of entrances and exits)
- File transfer: Allows you to send files to all participants via the Chat field
- Co-host: This allows you to control selectively who can use the Share Screen function (and can be revoked during the meeting)
- Polling
- Always show meeting control toolbar
- Screen sharing / Host only (to prevent anyone else from hijacking everyone's screen)
- Annotation / optional: Allow saving of shared screens with annotations
- Whiteboard / optional: Allow saving of whiteboard content
- Nonverbal feedback: Enables emojis and “raised hands” to be shown in the Participants window
- Meeting reactions: Students can show “thumbs up” and “applause” by clicking on Reactions
- Allow participants to rename themselves (so that their names appear on their images)
- Breakout room
- Virtual background
- Optional: Video filters
- When a cloud recording is available (see Recording for explanation)
Hosting a Zoom Meeting
Web portal: From the Zoom home page, click on Start a meeting.
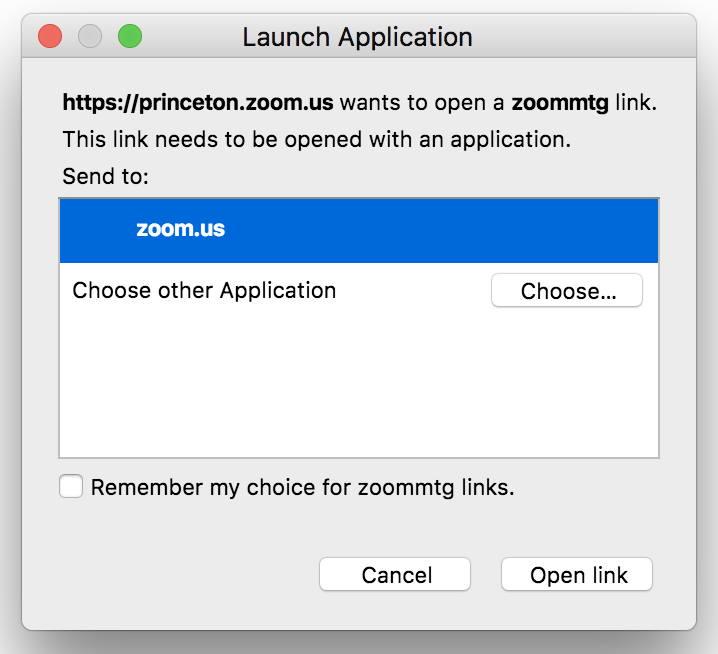
A “Launch Application” menu will appear, with “zoom.us” highlighted:

Click on Open link once it becomes active, and the meeting will begin when the video window appears, with the control bar displayed at the bottom.
If you are using the app: Click on the icon on your desktop or mobile device — and the video window will appear, with the control bar displayed at the bottom.
Inviting Participants
Send the full invitation (copied from the Meetings section of the “Sign in” page — or simply the meeting ID (number) — to all intended participants, unless Canvas has already done this for you.
When they ask to join the meeting, Zoom asks them for the Meeting ID, which then allows them to enter the meeting. (For extra security, you can require a password — in the Settings — which must be sent to all intended participants along with the Meeting ID.
References & Resources
Blum, S. (2020). Why We're Exhausted by Zoom. Inside Higher Ed. (April 22, 2020). Retrieved from https://www.insidehighered.com/advice/2020/04/22/professor‐explores‐why‐zoom‐classes‐deplete‐her‐energy‐opinion
Ashlee Espinosa: Using Zoom for Online Classes or Meetings (Getting Started)
Ashlee Espinosa: 10 Tips for Teaching Online or Using Zoom
