Zoom provides a range of options for recording meetings. You’ll need to set these up before opening a meeting, while the recording itself is controlled during the meeting.
Settings
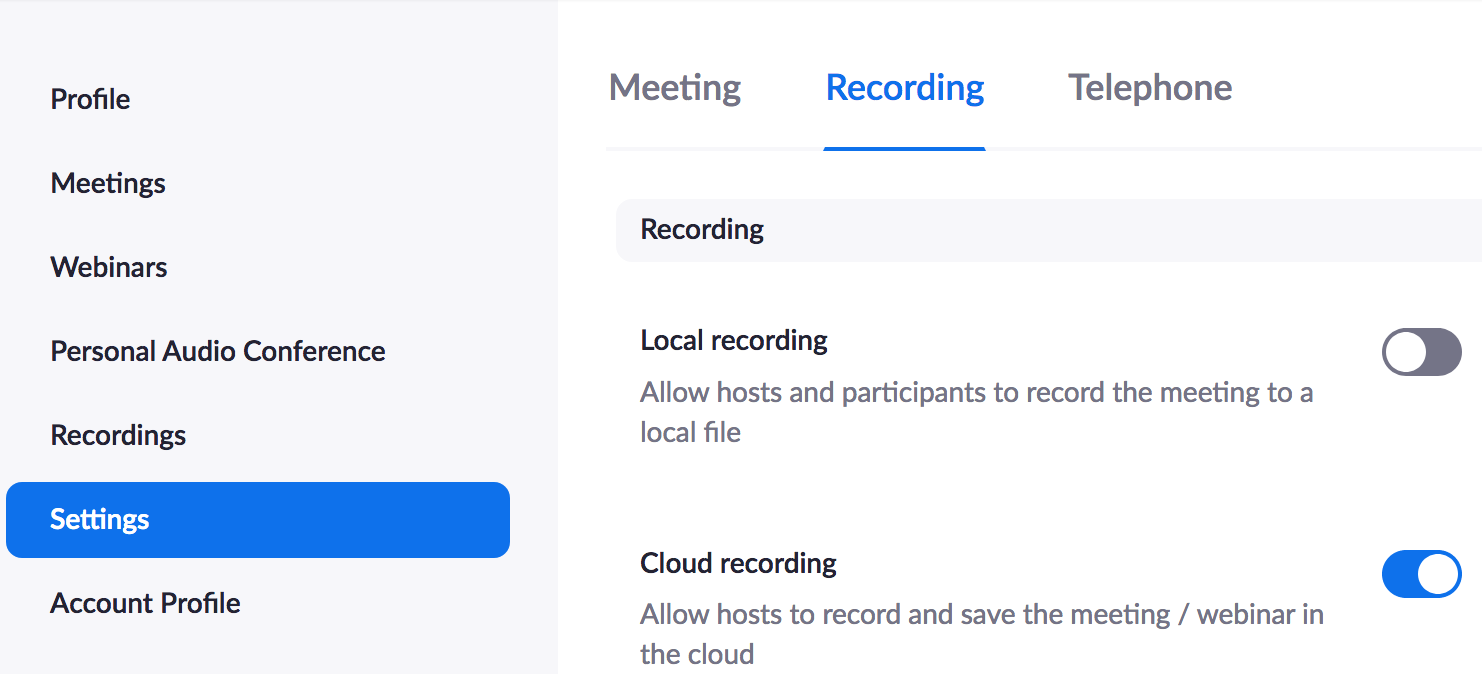
Go to the Settings in your Zoom account (via the Web portal, not the app)

Click on Recording at the top of the field to the right (as shown above) to bring up the recording options.
The first option — "Local" or "Cloud" storage — will determine where and by whom the resulting files can be accessed.
- Local files will be available solely on the host’s computer, but can distributed from there via email attachment (unless the file size prohibits that).
- Cloud files will be stored on Zoom's cloud servers, but accessible on any device for the host, and to anyone else who knows the correct filename.
This choice determines which portions of the meeting will be recorded:
- If the meeting is being recorded locally, all the Breakout Rooms visited by the host will be recorded (Main Session, and all Breakout Rooms joined by the host).
- If the meetings is recorded to the cloud, only the Main Session interactions will be recorded.
A practical tip: Fang Yan (CHI) suggests that it is more convenient to record to the Zoom cloud than to a local computer, since you can have all the recording choices in one folder and easily share the recording with students with one link.
In addition to these choices, you can decide:
- if the recording will be audio only (which will make the file size significantly smaller)
- if participants’ names will be included in the video recordings
- if a transcript should be produced (which may be of questionable quality in the case of L2 classes)
- and various options for who can access the recordings, and how

One final choice:
Under the Meeting heading in the Settings page, and then under Email Notification (at the bottom of that long list), you have a choice to enable “Notify host when cloud recording is available.” Zoom will send you an email to the address provided in your Profile to let you know that the recording of a specific meeting is available for retrieval — and an email (if you choose to allow it) to the person who scheduled the meeting, or to an alternative host.
Recording tips:
Look at your computer's camera while you speak, rather than at your face in the Zoom screen. The latter draws your eyes away from the camera and creates the impression for your viewer(s) that you’re not speaking directly to them.
If you find yourself distracted by your own image (which can lead more quickly to "Zoom fatigue"), it's possible hide your image on your own screen without turning off your camera. Move your mouse over your image, click on the three dots, and then click on Hide Self View in the drop-down menu. To restore your image to your screen, click on Show Self View.
To start recording:
- Click on Record on the control bar at the bottom of the screen
- A blinking red light in the upper left-hand corner of your screen indicates that the recording is taking place.
- To stop recording, click on the Stop button to the right of the blinking light.
To access the file afterwards:
- Follow the prompts on the email you receive (once the file has been processed) to play and/or download the file.
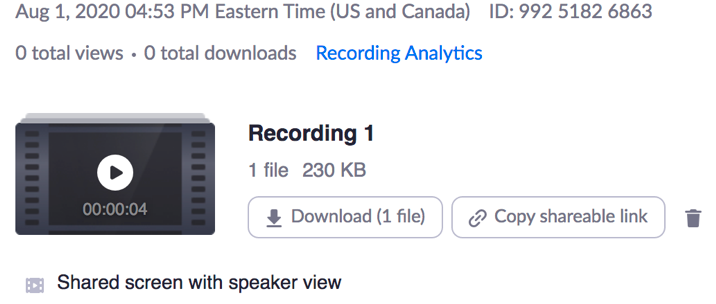
- You can access all the recordings you've by navigating to the Recordings page, using the left-hand column on the Sign in/Configure your account page, and then clicking on the desired file. This will bring up the following window:
- The file will appear there as an .mp4 file, ready to be opened or saved.

NB: All instructors should take note of these statements issued by the Dean of the College and the McGraw Center:
“The University strongly encourages you to record virtual class sessions so that students who are unable to attend a live session can later watch the recording.”
And regarding the privacy issues that arise in this context:
“Before recording a virtual class session, advance notice should be given to participants. It is recommended that at the beginning of each recorded session you orally remind participants that you are recording and that the recording is to be used as a reference resource for the class and not to be shared outside of the class. This oral notice should be captured on the audio recording. In addition, it is recommended that advance notice also be provided in your syllabus. You may choose to use the following statement:
Policy on Class Recording
I will be recording our class sessions for students who are unable to attend. You may choose to “opt out” of any recording, in which case you should contact me to arrange alternative ways to participate.
Faculty own the copyright to their instructional materials, and so students should not record any class sessions without my permission. For this same reason, recordings that I make of our class may not be posted online or shared with anyone other than students enrolled in this course.
“If a student self-identifies as having a disability and asks to record your class, please be in touch with the Office of Disability Services first.”
The full text – including important information on privacy and access to the recordings – can be found here under “Policy Guidance,” along with other useful resources provided by the McGraw Center.
Resources
Zoom's basic tutorial: [1:35]
More in-depth information on the recording process: [5:42]
Specific information on saving and sharing Zoom recordings: [3:58]
